Monday, May 22, 2024

How to check the accuracy of digital calipers
by
Published
Views:
To check the accuracy of digital calipers, compare their readings with known reference standards at several points across the measuring range. A zero reading with the jaws closed is a useful starting check, but it cannot show whether the caliper measures correctly when the jaws are open, whether the jaws are parallel, or whether the depth rod gives reliable results.
For a practical workshop check, use clean, undamaged gauge blocks or other suitable calibrated length standards. Record the difference between each reference value and the caliper reading, repeat the measurements, and compare the results with the accuracy requirement for the job. A quick check can reveal many problems, while formal calibration is appropriate when traceability or a documented uncertainty is required.
Prepare the caliper and reference standards
Start with the accuracy specification for the caliper and the tolerance on the part you intend to measure. The specification tells you what performance the manufacturer claims under stated conditions; the part tolerance tells you how much measurement uncertainty the job can accommodate. A caliper that is acceptable for a rough assembly check may not provide enough confidence for a tight fit.
Choose reference standards that cover the sizes you use most often, plus points toward the ends of the caliper’s range. Gauge blocks are a common choice for checking outside measurements because their lengths are known and their flat faces provide stable contact. Use standards with calibration and uncertainty suitable for the decision you need to make. A ruler, tape measure, or an unverified part is not a dependable reference for a fine accuracy check.
Clean the measuring faces, beam, and reference standards with a lint-free cloth. Remove chips, dust, dried coolant, and oil films that could hold the contact surfaces apart. Inspect the jaws for burrs, nicks, corrosion, or visible damage. Do not stone or file a damaged jaw unless you are qualified to repair the instrument; changing the measuring surface can make the error worse.
Let the caliper and standards reach a stable, similar temperature in the measuring area. Heat from a hand, direct sunlight, or a recently machined part can change dimensions enough to affect a close measurement. Handle reference surfaces as little as practical and avoid testing immediately after moving equipment from a much warmer or colder location.
Check zero and jaw condition
Close the outside jaws gently, using the same light contact force you would use during a measurement. The display should read zero. If it does not, clean the faces again, check for trapped debris, and use the zero function according to the caliper’s instructions. Open and close the jaws several times to see whether zero returns consistently.
A zero that shifts from one closure to the next can point to contamination, excessive force, a loose component, or an electronic problem. A stable zero is necessary, but it is only one observation: pressing the zero button can remove an offset on the display without correcting worn jaws or errors elsewhere along the beam.
With the jaws lightly closed, look for obvious damage or uneven contact. A light gap can reveal a gross problem, but it is not a precise test of jaw flatness or parallelism. Do not force the jaws together to make a gap disappear.
Compare readings with known lengths
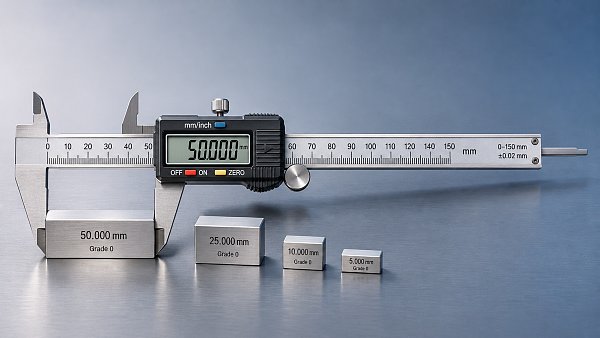
For an outside measurement check, select several gauge blocks or suitable combinations spanning the working range. Include sizes close to the dimensions you measure on actual parts. If the work regularly involves a narrow range, pay particular attention to that region rather than relying only on a check near zero.
- Position the standard squarely. Place the block between the outside jaws so the measuring faces contact the block faces without tilting. Keep the block and jaws clean throughout the check.
- Apply light, consistent pressure. Move the sliding jaw into contact without squeezing. Excessive force can flex the jaws or shift the block, producing a misleading reading.
- Read and record the result. Note the reference length and the displayed value, including the measurement units. Calculate error as the caliper reading minus the reference value.
- Repeat the measurement. Remove and reposition the block between readings. This helps reveal variation caused by technique, contact, or the instrument.
- Check additional lengths. Work across the range and return to zero afterward. A change in error with jaw opening can reveal a problem that a single-point check would miss.
For example, if a reference standard has an assigned length of 25.000 mm and the caliper reads 25.02 mm, the indicated error is +0.02 mm. Whether that result is acceptable depends on the applicable caliper specification, the uncertainty of the reference and check, and the measurement requirements of the job. Do not treat the displayed difference as a complete uncertainty assessment.
Check contact at different usable positions along the outside jaws, especially near the tips and closer to the beam. Keep the block square and use the same measuring force. Noticeable differences between positions may indicate jaw wear, lack of parallelism, flexing, or inconsistent technique. Repeat carefully before deciding that the instrument is at fault.
Check the measuring functions you actually use
Good outside measurements do not automatically prove that the inside jaws, depth rod, or step faces are accurate. These features contact the work differently and can be affected by wear or damage in different places.
Inside measurements
Use a suitable calibrated ring gauge or another reference designed for internal measurements. Insert the inside jaws far enough to make proper contact, keep the caliper aligned with the bore, and gently rock it to find the maximum reading across the diameter. A tilted caliper can produce a smaller reading than the true diameter.
Use a reference appropriate to the jaw geometry and the size being checked. The inside jaws may not seat correctly in very small holes, shallow recesses, or features with a chamfer. If you routinely inspect bores with tight tolerances, a bore gauge or other dedicated instrument may be more suitable.
Depth and step measurements
For depth, use a calibrated depth-setting standard or a suitable arrangement of reference surfaces. Place the base of the caliper flat on the top surface and extend the depth rod until it contacts the bottom without tilting. A narrow or uneven top surface can prevent the base from sitting squarely and cause a false reading.
For step measurements, use a known height difference and make sure both step-measuring faces seat fully. If the application depends on either function, check it directly; an outside-jaw comparison alone does not establish its performance.
Separate repeatability from accuracy
Repeatability describes how closely repeated readings agree under the same conditions. Accuracy concerns how close the result is to the reference value. A caliper can repeatedly show the same wrong result, so a tight group of readings is reassuring only when those readings also agree sufficiently with the standard.
If readings vary, check the measurement setup before making an adjustment. Look for a block that rocks between the jaws, changing hand pressure, contamination, or a reference that is difficult to hold square. Repeat the check with a consistent technique. If variation remains, inspect the slider and locking mechanism for looseness or sticking and follow the manufacturer’s maintenance instructions.
Also distinguish resolution from accuracy. Resolution is the smallest display increment; it does not guarantee that the displayed value is correct to that increment. Extra digits can make a reading look more certain than the instrument and measurement method justify.
Decide whether the result is usable
Compare the observed errors with the applicable limits for each function and test point. Use the manufacturer’s specification or your organization’s documented acceptance criteria, including any requirements for the reference standard and measurement uncertainty. If a result is close to a limit, uncertainty can affect the pass-or-fail decision; follow the applicable decision rule or send the caliper for calibration.
Next, consider the part tolerance. Even a caliper that passes its own specification may not be suitable for a feature with a very tight tolerance. When the potential measurement uncertainty takes up too much of the allowed tolerance, use a more appropriate instrument, such as a micrometer for an outside dimension or a dedicated bore gauge for an internal feature.
Record the date, instrument identification, reference standards, checked points, readings, and outcome. Include the function tested and any conditions or problems that affected the check. A simple record makes it easier to spot changes over time and explains what the check covered.
What to do when a caliper fails a check
Remove the caliper from measurements that depend on its accuracy and identify it so it is not returned to use by mistake. Clean it, inspect it, check the battery if the display is unstable, and repeat the measurements. Replace the battery according to the manufacturer’s instructions when needed, then recheck zero and the relevant reference points.
If the error persists, arrange repair, adjustment, or calibration through a competent service provider. Avoid compensating mentally for a known error unless a documented procedure specifically permits it: an error found at one length may not apply at another, and different measuring functions may behave differently.
Consider the measurements made since the last satisfactory check, especially if the caliper has been dropped, damaged, or used to accept close-tolerance parts. The possible effect depends on when the problem began and which dimensions were measured. Record the issue and follow the applicable inspection process before releasing affected work.
How often should you check digital calipers?
Check zero and cleanliness before use, particularly when the caliper is shared or moved between work areas. A comparison with a suitable reference can be useful at the start of a critical job, after a battery change, or whenever a reading seems inconsistent. Repeat the relevant check after a drop, impact, or other event that could affect the instrument.
The interval for documented calibration or verification should reflect how often the caliper is used, its environment, past stability, and the consequences of an incorrect measurement. A shop-floor caliper exposed to coolant and frequent handling may need closer attention than one kept for occasional inspection. Adjust the interval using recorded results and your organization’s measurement-control procedure.
For a dependable daily routine, keep the jaws clean, check zero, compare against a suitable reference when the job calls for it, and choose an instrument whose capability matches the tolerance. When a measurement affects acceptance of a critical part, use a controlled calibration process and account for measurement uncertainty.

The Archive Newsletter
Critical industrial intelligence delivered every Tuesday. Peer-reviewed summaries of the week's most impactful logistics and market shifts.